Skip to the content
Peregrine KnowledgebasePeregrine Knowledgebase
  • Go to website
  • Go to website
  • Yelp
  • Facebook
  • Twitter
  • Instagram
  • Email

How can we help you?

Hester Pro

21
  • Theme Installation
  • Steps after Activating Hester Pro theme
  • Add widgets in sidebar or in Footer widget area
  • Enable front page sections
  • Home Sections
    • Slider Section
    • Info section
    • Service section
    • About section
    • Team section
    • Testimonial section
    • Pricing plan section
    • Call to Action section
    • Gallery section
    • Fun-facts section
    • Feature section
    • Steps to start section
    • Work history / timeline section
    • Workflow section
    • Clients section
    • Extra section
    • Design options

Bloglo Pro & BlogHash Pro common

2
  • Add social media profile links in header
  • Post Formats

ShopWell Pro

58
  • Download & Install ShopWell Addons Plugin
  • How to Install and Activate Required and Recommended Plugins
  • Import Demo
  • Configure Product Images in WooCommerce
  • πŸ”¨ Product Archive Builder
  • πŸ› οΈ Single Product Builder
  • How to change homepage products in the ShopWell free theme?
  • Customizer
    • General
    • Styling
    • Typography
    • Topbar
    • Header
      • Topbar
      • Campaign Bar
      • Header Layout
      • Header specific pages
      • Overriding the Header on Specific Pages
      • Header Builder
      • Sticky Header
      • Header Background
      • Header Elements
        • πŸ” Configuring the Header Search in ShopWell Theme
        • πŸ‘€ Account
        • ❀️ Wishlist
        • πŸ”„ Compare
        • πŸ›’ Cart
        • πŸ“ Custom Text
        • Preferences πŸŒπŸ’±
        • View History
        • πŸ“Œ Primary Menu
        • πŸ“Œ Secondary Menu
        • πŸ—‚οΈ Category Menu
        • πŸ” Hamburger Menu
      • Mega Menu
        • Mega Menu Vertical
        • πŸ” Mega Menu Hamburger
        • 🧩 Configure Mega Menu
        • Mega Menu Horizontal
    • Footer
      • Footer
      • Overriding the Footer on specific pages
  • Elementor
    • βš™οΈ Elementor Basic Configuration Guide
    • Templates
    • πŸ“’ Popup Builder
    • ShopWell Builder
    • Widgets
      • πŸ›οΈ Product Deals Grid / Carousel
  • Pages
    • πŸ“„ Creating a Page
    • βš™οΈ Display Settings
  • Woocommerce
    • πŸ›’ Getting Started with WooCommerce
    • πŸ“„ WooCommerce Pages
    • πŸ›’ Customize the Checkout Page
    • πŸ“¦ Create an Order Tracking Page
    • πŸ‘€ My Account Page Setup in WooCommerce
    • πŸ›οΈ Catalog Mode
  • Shop
    • WishList & Compare
    • πŸ’± Currency Settings
    • πŸ›οΈ Shop Display
    • 🧩 Product Filters
  • Mobile
    • Topbar
    • Header
    • Footer
    • Miscellaneous
  • Home
  • Docs
  • πŸ“„ WooCommerce Pages
View Categories

πŸ“„ WooCommerce Pages

2 min read

When you install WooCommerce, it automatically creates essential pages for running your online store. These pages are set up via the Setup Wizard, but you can also configure or recreate them later if needed.

🧩 Default Pages Created by WooCommerce #

Upon installation, WooCommerce generates the following core pages:

  • Shop – Displays your product catalog (no content required).
  • Cart – Uses the [woocommerce_cart] shortcode to show cart contents.
  • Checkout – Uses the [woocommerce_checkout] shortcode to collect shipping and payment information.
  • My Account – Uses the [woocommerce_my_account] shortcode to let customers view orders, manage their accounts, and more.

These pages are essential for running your store properly and are tightly integrated into ShopWell’s layout and design.


πŸ” How to Reinstall WooCommerce Pages #

If you accidentally skipped the setup wizard or deleted the default pages, you can reinstall them:

  1. Go to WooCommerce β†’ Status β†’ Tools.
  2. Scroll down to Create default WooCommerce pages.
  3. Click Create pages.

πŸ”” Pages that already exist and are properly set up will not be replaced.


βš™οΈ Assigning WooCommerce Pages Manually #

If you’ve created custom pages or need to change which ones WooCommerce uses for Cart, Checkout, etc., follow these steps:
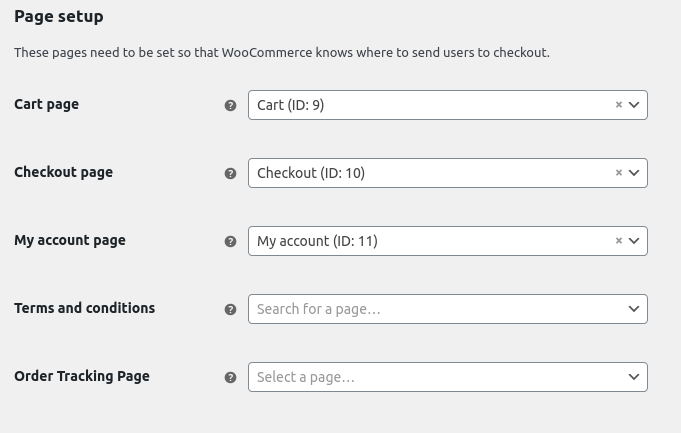
  1. Go to WooCommerce β†’ Settings β†’ Advanced.
  2. Under Page setup, assign the correct pages for:
    • Cart
    • Checkout
    • My Account
    • Terms and Conditions
    • Order Tracking Page

For the Shop page:

  • Navigate to WooCommerce β†’ Settings β†’ Products.
  • Under Shop pages, choose the page you’d like to serve as the product catalog.

πŸ›οΈ What Is the Shop Page? #

The Shop page acts as a product archiveβ€”a dynamic listing of your store’s products. It’s not a standard page you edit with a page builder, but rather a template automatically populated by WooCommerce.

πŸ’‘ Tip: If you’re using an SEO plugin, be sure to check its settings for custom post type archives. That’s where you’ll often find controls for optimizing your Shop page.

Table of Contents
  • 🧩 Default Pages Created by WooCommerce
  • πŸ” How to Reinstall WooCommerce Pages
  • βš™οΈ Assigning WooCommerce Pages Manually
  • πŸ›οΈ What Is the Shop Page?

© 2025 Peregrine Knowledgebase

Powered by WordPress

To the top ↑ Up ↑