Skip to the content
Peregrine KnowledgebasePeregrine Knowledgebase
  • Go to website
  • Go to website
  • Yelp
  • Facebook
  • Twitter
  • Instagram
  • Email

How can we help you?

Popular Search socialheadersocial mediahowimage

Hester Pro

21
  • Theme Installation
  • Steps after Activating Hester Pro theme
  • Add widgets in sidebar or in Footer widget area
  • Enable front page sections
  • Home Sections
    • Slider Section
    • Info section
    • Service section
    • About section
    • Team section
    • Testimonial section
    • Pricing plan section
    • Call to Action section
    • Gallery section
    • Fun-facts section
    • Feature section
    • Steps to start section
    • Work history / timeline section
    • Workflow section
    • Clients section
    • Extra section
    • Design options

Bloglo Pro & BlogHash Pro common

2
  • Add social media profile links in header
  • Post Formats

ShopWell Pro

59
  • Download & Install ShopWell Addons Plugin
  • How to Install and Activate Required and Recommended Plugins
  • Import Demo
  • Configure Product Images in WooCommerce
  • 🔨 Product Archive Builder
  • 🛠️ Single Product Builder
  • How to change homepage products in the ShopWell free theme?
  • Customizer
    • General
    • Styling
    • Typography
    • Topbar
    • Header
      • Topbar
      • Campaign Bar
      • Header Layout
      • Header specific pages
      • Overriding the Header on Specific Pages
      • Header Builder
      • Sticky Header
      • Header Background
      • Header Elements
        • 🔍 Configuring the Header Search in ShopWell Theme
        • 👤 Account
        • ❤️ Wishlist
        • 🔄 Compare
        • 🛒 Cart
        • 📝 Custom Text
        • Preferences 🌍💱
        • View History
        • 📌 Primary Menu
        • 📌 Secondary Menu
        • 🗂️ Category Menu
        • 🍔 Hamburger Menu
      • Mega Menu
        • Mega Menu Vertical
        • 🍔 Mega Menu Hamburger
        • 🧩 Configure Mega Menu
        • Mega Menu Horizontal
    • Footer
      • Footer
      • Overriding the Footer on specific pages
  • Elementor
    • ⚙️ Elementor Basic Configuration Guide
    • Templates
    • 📢 Popup Builder
    • ShopWell Builder
    • Widgets
      • 🛍️ Product Deals Grid / Carousel
  • Pages
    • 📄 Creating a Page
    • ⚙️ Display Settings
  • Woocommerce
    • 🛒 Getting Started with WooCommerce
    • 📄 WooCommerce Pages
    • 🛒 Customize the Checkout Page
    • 📦 Create an Order Tracking Page
    • 👤 My Account Page Setup in WooCommerce
    • 🛍️ Catalog Mode
  • Shop
    • WishList & Compare
    • 💱 Currency Settings
    • 🛍️ Shop Display
    • 🧩 Product Filters
  • Mobile
    • Topbar
    • Header
    • Footer
    • Miscellaneous
  • Translation
    • Quick Start Guide: TranslatePress

Blogsy Lite

14
  • Installation and Demo Import
  • Customizer : General Options
    • General (Logo, colors, typography and misc)
    • Top bar
    • Header & Footer
    • Blog page / Archive and Single Post
    • Sidebar
    • Breadcrumbs and Dark Mode
  • Customizer: Home sections
    • Highlight Breaking News with the Ticker Section
    • Hero Section – Featured Post Slider or Custom Hero Content
    • Stories
    • Featured Category
    • Featured Links
    • Posts You Might Like
    • Advertisement
  • Home
  • Docs
  • 🛒 Customize the Checkout Page
View Categories

🛒 Customize the Checkout Page

You can customize the appearance of your WooCommerce checkout page using the WordPress Customizer. This allows you to control which fields are visible, and set privacy and terms policies for your customers.

⚠️ Important:
The section Customizing ▸ WooCommerce ▸ Checkout will only be available if your checkout page contains the classic [woocommerce_checkout] shortcode.
If you’re using the new WooCommerce Checkout Block, these options won’t appear in the Customizer.


🧾 Checkout Customization Options #

Navigate to:
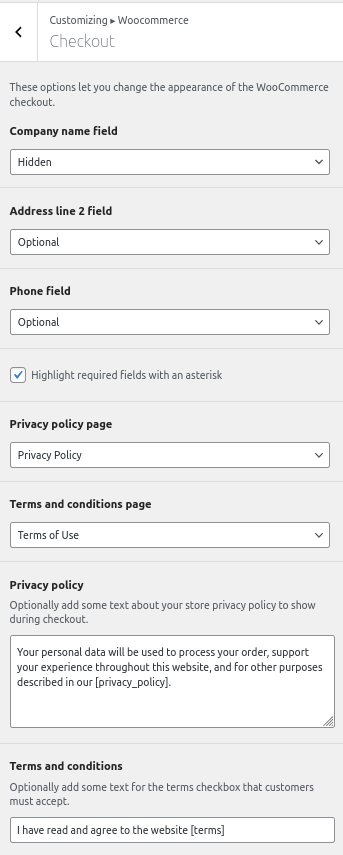
Appearance → Customize → WooCommerce → Checkout

Here you can configure the following settings:

  1. Company Name Field
    Choose whether to display this field as Hidden, Optional, or Required.
  2. Address Line 2 Field
    Set this secondary address field to Optional, Required, or hide it completely.
  3. Phone Field
    Control whether customers must provide a phone number. Options include Hidden, Optional, or Required.
  4. Privacy Policy Page
    Select the page on your site that contains your store’s privacy policy.
  5. Terms and Conditions Page
    Choose a page that outlines your store’s terms and conditions.
  6. Privacy Policy Text
    Add custom text to be shown near the privacy policy agreement during checkout.
    Example:
    “Your personal data will be used to process your order and support your experience throughout this website…”
  7. Terms and Conditions Text
    Add the wording for the checkbox that customers must check to agree to your terms before placing an order.
    Example:
    “I have read and agree to the website terms and conditions.”

Customizing the checkout page improves your store’s user experience and ensures you collect the information you need—while staying transparent and compliant with legal requirements.

📄 WooCommerce Pages📦 Create an Order Tracking Page
Table of Contents
  • 🧾 Checkout Customization Options

© 2026 Peregrine Knowledgebase

Powered by WordPress

To the top ↑ Up ↑