Skip to the content
Peregrine KnowledgebasePeregrine Knowledgebase
  • Go to website
  • Go to website
  • Yelp
  • Facebook
  • Twitter
  • Instagram
  • Email

How can we help you?

Popular Search socialheadersocial mediahowimage

Hester Pro

21
  • Theme Installation
  • Steps after Activating Hester Pro theme
  • Add widgets in sidebar or in Footer widget area
  • Enable front page sections
  • Home Sections
    • Slider Section
    • Info section
    • Service section
    • About section
    • Team section
    • Testimonial section
    • Pricing plan section
    • Call to Action section
    • Gallery section
    • Fun-facts section
    • Feature section
    • Steps to start section
    • Work history / timeline section
    • Workflow section
    • Clients section
    • Extra section
    • Design options

Bloglo Pro & BlogHash Pro common

2
  • Add social media profile links in header
  • Post Formats

ShopWell Pro

59
  • Download & Install ShopWell Addons Plugin
  • How to Install and Activate Required and Recommended Plugins
  • Import Demo
  • Configure Product Images in WooCommerce
  • 🔨 Product Archive Builder
  • 🛠️ Single Product Builder
  • How to change homepage products in the ShopWell free theme?
  • Customizer
    • General
    • Styling
    • Typography
    • Topbar
    • Header
      • Topbar
      • Campaign Bar
      • Header Layout
      • Header specific pages
      • Overriding the Header on Specific Pages
      • Header Builder
      • Sticky Header
      • Header Background
      • Header Elements
        • 🔍 Configuring the Header Search in ShopWell Theme
        • 👤 Account
        • ❤️ Wishlist
        • 🔄 Compare
        • 🛒 Cart
        • 📝 Custom Text
        • Preferences 🌍💱
        • View History
        • 📌 Primary Menu
        • 📌 Secondary Menu
        • 🗂️ Category Menu
        • 🍔 Hamburger Menu
      • Mega Menu
        • Mega Menu Vertical
        • 🍔 Mega Menu Hamburger
        • 🧩 Configure Mega Menu
        • Mega Menu Horizontal
    • Footer
      • Footer
      • Overriding the Footer on specific pages
  • Elementor
    • ⚙️ Elementor Basic Configuration Guide
    • Templates
    • 📢 Popup Builder
    • ShopWell Builder
    • Widgets
      • 🛍️ Product Deals Grid / Carousel
  • Pages
    • 📄 Creating a Page
    • ⚙️ Display Settings
  • Woocommerce
    • 🛒 Getting Started with WooCommerce
    • 📄 WooCommerce Pages
    • 🛒 Customize the Checkout Page
    • 📦 Create an Order Tracking Page
    • 👤 My Account Page Setup in WooCommerce
    • 🛍️ Catalog Mode
  • Shop
    • WishList & Compare
    • 💱 Currency Settings
    • 🛍️ Shop Display
    • 🧩 Product Filters
  • Mobile
    • Topbar
    • Header
    • Footer
    • Miscellaneous
  • Translation
    • Quick Start Guide: TranslatePress

Blogsy Lite

14
  • Installation and Demo Import
  • Customizer : General Options
    • General (Logo, colors, typography and misc)
    • Top bar
    • Header & Footer
    • Blog page / Archive and Single Post
    • Sidebar
    • Breadcrumbs and Dark Mode
  • Customizer: Home sections
    • Highlight Breaking News with the Ticker Section
    • Hero Section – Featured Post Slider or Custom Hero Content
    • Stories
    • Featured Category
    • Featured Links
    • Posts You Might Like
    • Advertisement
  • Home
  • Docs
  • Advertisement
View Categories

Advertisement

The Advertisement section in Blogsy lets you display ad banners or AdSense code in multiple locations across your site.
You can create multiple ad items, choose between Banner and AdSense types, and control where and on which devices each ad appears.

Location #

Go to Appearance → Customize → Advertisement.
Each item inside this panel represents one ad unit that you can configure separately.


Creating an ad item #

Click + Add Widget to create a new Advertisement item.
Each item has the following settings:
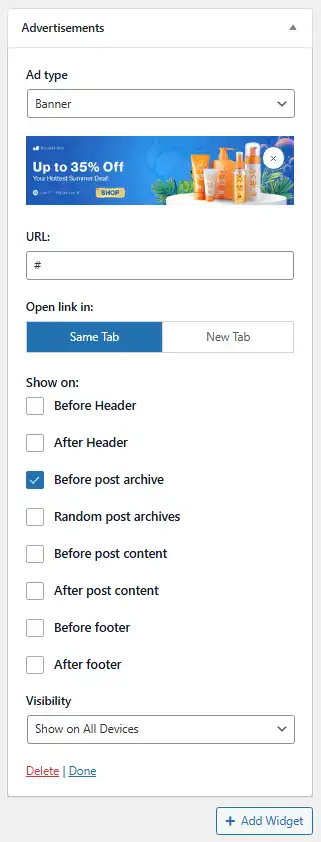
Ad type #

  • Ad type
    • Banner – Use a static image banner and optional URL.
    • AdSense – Paste Google AdSense (or similar network) code directly.

Switching the type changes the available fields under the item.


Banner ads #

When Ad type is set to Banner, these options are available:

  • Image
    • Upload or select the banner image from the Media Library.
    • Recommended to match standard ad sizes (e.g., 728×90, 970×250) for best results.
  • URL
    • Enter the destination link to open when visitors click the banner (for example, a product page, affiliate link, or internal landing page).
  • Open link in
    • Same Tab – Opens the URL in the current browser tab.
    • New Tab – Opens the URL in a new tab, keeping the site open.

AdSense / code ads #

When Ad type is AdSense, the image and URL are replaced with a code field:

  • Content
    • Paste your AdSense (or other ad network) script/code snippet into this textarea.
    • Shortcodes and basic HTML are allowed, so you can also embed shortcodes from ad management plugins.
    • Make sure your site complies with your ad network’s policies before adding code.

Display locations #

For both Banner and AdSense ads, you can choose where the ad appears using the Show on: checkboxes:

  • Before Header – Renders the ad above the site header.
  • After Header – Displays the ad just below the header (commonly used for leaderboard banners as in the screenshot).
  • Before post archive – Shows the ad before the posts list on archive/blog pages.
  • Random post archives – Inserts the ad in random positions within post archives.
  • Before post content – Shows the ad before the main post content on single post pages.
  • After post content – Shows the ad after the main post content, but before comments/related posts.
  • Before footer – Displays the ad above the footer area.
  • After footer – Displays the ad below the footer (e.g., full-width bottom banner).

You can tick multiple positions for a single ad item if you want it to appear in more than one place.


Device visibility #

  • Visibility
    • Controls where this specific ad item appears based on device type.
    • Typical options:
      • Show on All Devices
      • Show on Desktop only
      • Show on Tablet only
      • Show on Mobile only
    • Use this to create separate ad units optimized for different screen sizes (for example, a wide banner only on desktop and a tall banner only on mobile).

Managing multiple ads #

  • You can add multiple Advertisement items via + Add Widget.
  • Each item can:
    • Use a different Ad type (some banner, some AdSense).
    • Target different Show on positions.
    • Have its own Visibility rules.
  • Use the Delete | Done links inside each item to remove or collapse the configuration.

By combining banner and AdSense ads with flexible placement and device targeting, the Advertisement section in Blogsy gives you fine-grained control over monetization without editing theme files.

Posts You Might Like
Table of Contents
  • Location
  • Creating an ad item
  • Ad type
  • Banner ads
  • AdSense / code ads
  • Display locations
  • Device visibility
  • Managing multiple ads

© 2026 Peregrine Knowledgebase

Powered by WordPress

To the top ↑ Up ↑