Skip to the content
Peregrine KnowledgebasePeregrine Knowledgebase
  • Go to website
  • Go to website
  • Yelp
  • Facebook
  • Twitter
  • Instagram
  • Email

How can we help you?

Popular Search socialheadersocial mediahowimage

Hester Pro

21
  • Theme Installation
  • Steps after Activating Hester Pro theme
  • Add widgets in sidebar or in Footer widget area
  • Enable front page sections
  • Home Sections
    • Slider Section
    • Info section
    • Service section
    • About section
    • Team section
    • Testimonial section
    • Pricing plan section
    • Call to Action section
    • Gallery section
    • Fun-facts section
    • Feature section
    • Steps to start section
    • Work history / timeline section
    • Workflow section
    • Clients section
    • Extra section
    • Design options

Bloglo Pro & BlogHash Pro common

2
  • Add social media profile links in header
  • Post Formats

ShopWell Pro

59
  • Download & Install ShopWell Addons Plugin
  • How to Install and Activate Required and Recommended Plugins
  • Import Demo
  • Configure Product Images in WooCommerce
  • 🔨 Product Archive Builder
  • 🛠️ Single Product Builder
  • How to change homepage products in the ShopWell free theme?
  • Customizer
    • General
    • Styling
    • Typography
    • Topbar
    • Header
      • Topbar
      • Campaign Bar
      • Header Layout
      • Header specific pages
      • Overriding the Header on Specific Pages
      • Header Builder
      • Sticky Header
      • Header Background
      • Header Elements
        • 🔍 Configuring the Header Search in ShopWell Theme
        • 👤 Account
        • ❤️ Wishlist
        • 🔄 Compare
        • 🛒 Cart
        • 📝 Custom Text
        • Preferences 🌍💱
        • View History
        • 📌 Primary Menu
        • 📌 Secondary Menu
        • 🗂️ Category Menu
        • 🍔 Hamburger Menu
      • Mega Menu
        • Mega Menu Vertical
        • 🍔 Mega Menu Hamburger
        • 🧩 Configure Mega Menu
        • Mega Menu Horizontal
    • Footer
      • Footer
      • Overriding the Footer on specific pages
  • Elementor
    • ⚙️ Elementor Basic Configuration Guide
    • Templates
    • 📢 Popup Builder
    • ShopWell Builder
    • Widgets
      • 🛍️ Product Deals Grid / Carousel
  • Pages
    • 📄 Creating a Page
    • ⚙️ Display Settings
  • Woocommerce
    • 🛒 Getting Started with WooCommerce
    • 📄 WooCommerce Pages
    • 🛒 Customize the Checkout Page
    • 📦 Create an Order Tracking Page
    • 👤 My Account Page Setup in WooCommerce
    • 🛍️ Catalog Mode
  • Shop
    • WishList & Compare
    • 💱 Currency Settings
    • 🛍️ Shop Display
    • 🧩 Product Filters
  • Mobile
    • Topbar
    • Header
    • Footer
    • Miscellaneous
  • Translation
    • Quick Start Guide: TranslatePress

Blogsy Lite

15
  • Installation and Demo Import
  • Customizer : General Options
    • General (Logo, colors, typography and misc)
    • Top bar
    • Header & Footer
    • Blog page / Archive and Single Post
    • Sidebar
    • Breadcrumbs and Dark Mode
  • Video Tutorials
    • Video Tutorials
  • Customizer: Home sections
    • Highlight Breaking News with the Ticker Section
    • Hero Section – Featured Post Slider or Custom Hero Content
    • Stories
    • Featured Category
    • Featured Links
    • Posts You Might Like
    • Advertisement

Blogsy Pro / Blogsy Addons

14
  • Blogsy Addons Requirement
  • Installation
  • Install plugins
  • Import Demo
  • Create Header & Footer
  • Setting Up Menus
  • Setting Up the Mobile Menu
  • Setting Up a Mega Menu
  • Creating a Custom Archive Page
  • Display Related Posts
  • Sidebar layout & sticky sidebar
  • Post Layout & Post Format
  • User Avatar and Social Profiles
  • AMP support in Blogsy Pro
  • Home
  • Docs
  • Setting Up a Mega Menu
View Categories

Setting Up a Mega Menu

Blogsy Pro lets you turn any top‑level menu item into a mega menu, either using a predefined multi‑column layout or a custom Blogsy Template built with Elementor.

Open your menu #

  1. Go to Appearance → Menus.
  2. Select the menu that is assigned as your Primary menu (or the menu used in your header template).

Enable mega menu on a parent item #

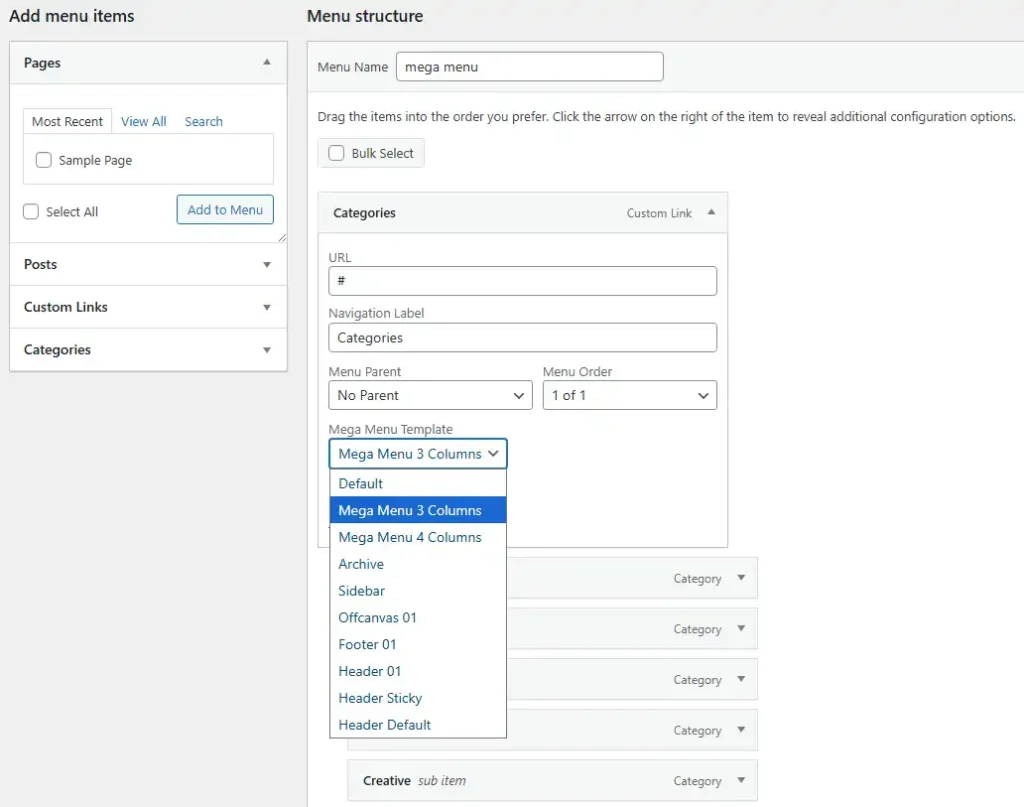
  1. In the Menu structure area, find the top‑level item you want to use as the mega menu parent (for example, “Categories”).
  2. Click the small arrow on the right of that item to expand its settings.
  3. Locate the Mega Menu Template dropdown.
  4. Choose one of the available options:
    • Default – regular dropdown (no mega menu).
    • Mega Menu 3 Columns – built‑in three‑column mega menu layout.
    • Mega Menu 4 Columns – built‑in four‑column mega menu layout.
    • Any Blogsy Template (e.g., “Mega Menu 3 Columns”, “Archive”, “Sidebar”) – uses a custom mega menu layout created under Blogsy Templates.

Configure child items for 3/4‑column mega menus #

When using the built‑in Mega Menu 3 Columns or Mega Menu 4 Columns option:

  • The parent menu item should have only one level of child items.
  • Do not create deeper sub‑children under those items.
  • Blogsy will automatically distribute the direct child items into 3 or 4 columns in the mega menu panel.

This structure ensures a clean, predictable layout and prevents overly complex nested menus inside the mega menu.

Click Save Menu when you are done. Your selected parent item will now open a mega menu panel on hover (desktop) or tap (mobile/ tablet), populated according to the chosen layout or Blogsy Template.

Setting Up the Mobile MenuCreating a Custom Archive Page
Table of Contents
  • Open your menu
  • Enable mega menu on a parent item
  • Configure child items for 3/4‑column mega menus

© 2026 Peregrine Knowledgebase

Powered by WordPress

To the top ↑ Up ↑